[00:00:00]
Okay. Thank you so much for joining everybody. Let’s get started. I’m Mahashree, your host, and over the next 45 minutes or so, we are going to be answering an important question: How to pick the right document extraction platform in 2026. But why is this question exactly relevant now?
The AI wave started towards the end of 2022, and since then we’ve seen businesses move fast. AI agents have been adopted across
[00:00:30]
operations, budgets are being allocated, pilots are being run, and there’s in general a lot of activity that’s happening. But data shows that while many businesses are actively testing out AI tools and around 67 percent just in document extraction, fewer than five percent are actually in production.
So why is this gap present? When we take a closer look at businesses that have actually crossed into production, we see that they didn’t just pick a better
[00:01:00]
model for data extraction, they picked a better platform. A platform built for full workflow, from document ingestion to deployment and everything in between.
And that’s exactly the gap that we are going to be addressing in the session today.
So here’s the agenda for this webinar. We’ll start by covering some critical challenges faced in legacy IDP and how AI poses a solution. Moving on from there, we’ll go through a
[00:01:30]
detailed AI capability checklist where we look at what are some essential capabilities that a platform for document extraction must have in 2026.
Now, this will also be accompanied by a hands-on walkthrough or a demo segment with Unstract. And finally, we open the floor for questions, and we’ll conclude with an interactive Q&A. Now, before I open up the session, here are a few housekeeping items I’d like to quickly run over. So firstly, this is a listen-only webinar, so all
[00:02:00]
attendees will automatically be on mute.
In case you have any questions, do drop them in the Q&A tab at any time during the session, and one of us from the team will be able to get back to you with the answers via text. In case your question isn’t answered, we’ll be taking it up towards the end of the session in our interactive Q&A. Now, you can also use the chat tab to introduce yourselves, let us know where you’re joining from, and this is also where you let us know in case you run into any technical glitches during this webinar.
And as a final point, when you exit this session,
[00:02:30]
you’ll be redirected to a feedback form where I request you to leave a review on so that we can improve our sessions going forward. So that said, here’s why legacy IDP breaks down. So firstly, legacy IDP is built for predictability and not reality. What we mean by this is that legacy IDP systems were built around fixed templates for structured documents.
So naturally, they expect documents to always look the same. But real-world
[00:03:00]
scenario is far away from that. Vendors change invoice layouts all the time. Forms vary by region. No two contracts look identical. So the moment a document deviates from what the system was trained on, it automatically breaks, and someone has to manually step in and fix the problem.
Secondly, low accuracy means high review burden. Now, legacy IDP uses rule-based templates to extract data, which means documents have to be structured for them to work.
[00:03:30]
However, stats do reveal that eighty percent of business documents are unstructured, which means these systems are going to struggle with them.
Moreover, think about scanned PDFs, handwritten fields, or tables that span across multiple pages. These kinds of documents lead to low extraction accuracy with legacy IDP, and the extraction errors pile up, and eventually your team ends up spending a whole lot of time reviewing and correcting these outputs.
Thirdly, legacy IDP hits the ceiling fast when it
[00:04:00]
comes to scalability. So as document volumes grow or as you start dealing with more document variants, and by variants we could be talking about formats, languages, or layouts. So as you’re dealing with more variants, legacy systems simply struggle to keep up because you end up building separate pipelines for each of these variants, and that means more cost, more maintenance, and eventually more points of failure.
And finally, there is the integration and maintenance burden. So connecting legacy IDP
[00:04:30]
to your ERP, CRM, or database isn’t plug-and-play. These integrations are custom-built, fragile, and could also be expensive to maintain. So every system update or document change risks breaking the pipeline down, and your IT team has to bear the cost indefinitely.
So if you are currently using legacy systems for document extraction, you might be facing any of these issues listed over here. And I also suggest that you let us know in chat about any other problems that you’re facing so that our audience over here can have a
[00:05:00]
better picture of the ground reality, and we could also probably help you with them going forward.
So that said, these are all the reasons why businesses today are turning to AI platforms for support, because AI is almost like a one-stop solution to address all these issues So what does AI have to offer? If we briefly put it, AI comes with three major strongholds that are reshaping the document extraction landscape.
So firstly, AI understands the context of your
[00:05:30]
document. It isn’t just extracting the text or characters like legacy IDP. So this in itself brings a massive difference because now even if your whole document changes layout or if you introduce new documents and, um, you have new requirements out of your extraction, AI again is going to work on it without any training or without you having to rework on the pipeline.
Secondly, AI scales without rebuilding. This is a tangent from the previous point
[00:06:00]
discussed. Now, scaling could mean two different things. Scaling in terms of having to process new documents or scaling in terms of specifying entirely new fields to extract from these documents, both of which can be easily done with AI and you don’t even need IT assistance Thirdly, another key differentiator for AI is that it gets smarter with time.
So as time goes by, AI models are only getting smarter, in stark contrast to legacy IDP, where the systems kind of stay frozen in time. So platforms
[00:06:30]
that facilitate AI-powered document extraction, like Unstract, are only making it more efficient and easy to use. So clearly, AI is making waves, no doubt. But what– why is it that businesses are still struggling to adopt them in practice?
A major reason could be that AI alone is not enough. AI is really good for document data extraction for the extraction part, but end-to-end document processing comes with a lot more operations than just that, which is
[00:07:00]
why you need a robust AI-driven document extraction platform like Unstract. So now let’s move on into the checklist of capabilities I was talking about earlier.
So we’ll go over what are all the must-have capabilities for a document extraction platform in 2026. And, uh, before I reveal the checklist, because I’m going to be demonstrating these capabilities with Unstract, let me just introduce the platform to you. So Unstract is an agentic AI document processing platform.
And if I
[00:07:30]
have to briefly talk to you about what Unstract does, I can give you three main phases that it goes through. So firstly, we have the text extraction phase. So once you upload your documents into the platform or once you get it from the source, the first step is to extract the raw text from your documents and pre-process it for LLM consumption.
Because even advanced LLMs today still struggle with documents that could be difficult to read. This could mean having to read scanned documents or
[00:08:00]
documents with handwritten text, with grainy or noisy documents. So all of this needs to be first pre-processed so that the LLM can function properly, and that is what happens in this stage.
Once you extract the text, you pass it on to the development stage, where you define prompts that define two key criteria. That is, one, what is the schema of data that you’re– what is the data that you’re looking to extract from the document, and what is the schema of extraction that you’re going for? So these two main aspects
[00:08:30]
are defined in the prompt.
And, uh, you also ensure in the development phase that the extraction output is accurate. So Unstract again comes with accuracy-enabling capabilities that we’ll be covering in the demo segment So once you define your prompts, you’re happy with how the extraction is being done, you move on into the deployment phase where you can deploy this project in, in any of the options that suits you best.
So currently, we support native deployments like APIs, ETL pipelines, task pipelines, or you can
[00:09:00]
also go for more advanced options like deploying your projects as an MCP tool or using it in an N8N automation workflow. So these are all aspects of Unstract that I’m going to be diving a little deeper into when we go over the checklist.
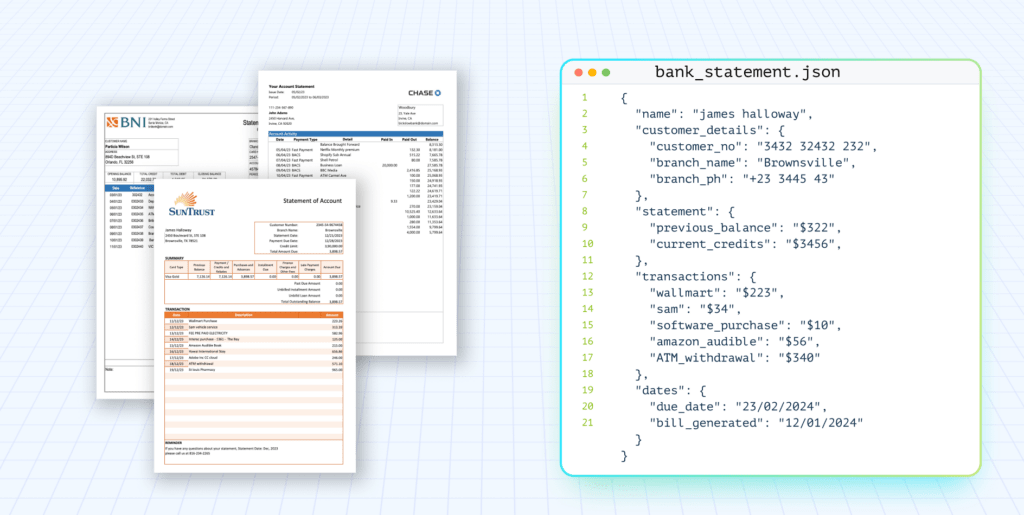
So again, if I have to throw some numbers on the platform, currently we have six point six k plus stars on GitHub, a thousand plus member Slack community, and we’re currently processing over ten million pages per month by paid users alone. So that said, let’s move on to the
[00:09:30]
2026 platform readiness checklist for document extraction.
So these are ten capabilities that you could use to evaluate when choosing an AI document platform. So, uh, firstly, we have business connectivity, and that is what we’ll be starting with So the first thing to check is connectivity. Your document extraction platform has to fit into your existing ecosystem without friction, which means it needs to connect with the sources from which you’re gonna get your documents.
It could mean email
[00:10:00]
inboxes, cloud drives, FTP servers, or APIs on the input side. And it also needs to connect with the output destination. It could be your ERP, CRM database on the output side. So if your platform cannot handle both these end screens, then again, you will ha– you will need manual work to fill in the gaps.
So here, let’s take a look at what are some, uh, connectors that Unstract natively connects with. So the– this is on the input side, side with the file systems. So you can see that the
[00:10:30]
platform natively integrates with Dropbox, Google Drive, S3, SharePoint, and so on. And, uh, moving on, we have the output destination connectors over here that Unstract natively, uh, connects with.
And if your specific connector isn’t on this list, you still have other options like API deployments or workflow automation tools like n8n, MCP servers that can bridge the gap. So the first, uh, point is that you need to evaluate the platform on how well it connects with other sources and whether it fits
[00:11:00]
your particular business needs.
And the second point in the checklist is document pre-processing. Now, LLMs are great at document extraction, but as I mentioned earlier, even advanced models can fail when they directly work on certain documents. So this is exactly where we need a pre-processing tool or a text extractor. So Unstract lets you choose from multiple text extractors.
So these are all the tools that we currently natively integrate with. And one of the popular choices we see our users make
[00:11:30]
is going for LLM Whisperer, which is again, Unstract’s in-house text extractor tool. Now, LLM Whisperer is the popular choice for a reason because it is very good at preserving the layout of the original document while extracting the text.
And why is this exactly important? Because LLMs con– LLMs read and consume information very much similar to how humans do, which is why it is best to retain the original layout of the document when passing the information to the LLM. So that is exactly what LLM Whisperer does.
[00:12:00]
It works phenomenally well even on handwritten, uh, documents with handwritten text or bad scans.
And let’s just go, uh, to a demo segment where I show you how this, um, actually works. And LLM Whisperer is also a standalone application in case you need to, uh, try it out and that is the only requirement you have. So what you’re seeing over here is the LLM Whisperer playground, and you can upload any, uh, sample business document of your own over here and extract the, uh, text from it.
[00:12:30]
We also have certain pre-uploaded documents for you to analyze how the tool works. So for instance, if I open this particular, uh, document over here, you can see it’s a scanned receipt and it’s a pretty bad scan. We have bad lighting. It looks like a photo taken on a mobile phone. We also have some oil stains over here, and the text is not very legible.
So this is basically the document I need to extract data from. So if I pass this directly to the LLM, it’s going to be difficult for the LLM to accurately extract the data.
[00:13:00]
So this is what the pre-processor or LLM Whisperer does. You can see that, uh, the system has been able to extract the exact text from the, uh, this particular document, and it has been able to maintain the layout as well, so that the LLM, when it, uh, subsequently performs data extraction, can understand the context.
So this is basically the context that will be sent for data extraction Now let’s explore some other, uh, document over here. So we have
[00:13:30]
an inverted, a disoriented, uh, ID card over here. So ID cards are pretty commonly scanned and used for data extraction. So let’s see how the platform is able to extract the text.
So you have over here that the platform’s actually been able to extract it with the, uh, text properly aligned and while still preserving the layout of the original document and that is, uh, another powerful capability that you’re seeing over here. So moving on, we have a couple of other, uh, documents. For
[00:14:00]
instance, over here we have a scan.
It’s a loan application with some handwritten text in it. So it’s a mix of, uh, radio buttons, handwritten text, check, uh, text boxes. So again, this is another, uh, document that could be quite difficult. So you can see how LLMWhisperer has been able to extract the text. And you have the checkboxes extracted with the values as well.
So for instance, over here, uh, they’ve clicked the first– they’ve checked the first cell in under type of credit, and you can see that has
[00:14:30]
been represented over here with an X in, in the box. So similarly, we have all the other, uh, details over here, the rent that has been checked. So you can go through this for your particular business documents.
All you have to do is click on Upload, upload a document of your own, and you can get started. So LLMWhisperer supports, um, you to upload a hundred document– a hundred pages per day for free and access the end-to-end platform capabilities. So this lets you, you know, get ample time to evaluate the
[00:15:00]
platform and see how best it suits your particular business.
Now let me go back to the presentation, and that was document pre-processing. Now moving on to the next, uh, item on the checklist, that is agentic extraction. Now, here’s another defining capability of 2026. Gone are the days when you have to spend time on manual prompt engineering. Modern extraction platforms today come with agentic extraction that auto-generates output schema and extraction prompts
[00:15:30]
within minutes.
So this brings it down from days and weeks that were earlier being spent on manual prompt engineering. In Unstract, you can also edit these auto-generated prompts and fine-tune them further to suit your needs. So we’ll be exploring this on Unstract, but before that, let me quickly run you through the next point as well, since we’ll be covering them both in the demo together.
So up next we have as a fourth point on the checklist, accuracy and verification mechanisms. So LLMs are powerful,
[00:16:00]
but they can hallucinate. And in document processing, an hallucinated field value can cause real downstream damage. This is why your platform needs built-in tools to catch and flag errors before they make it into your systems.
So at Unstract, we approach this in multiple ways. For agentic workflows, the system uses a built-in verification mechanism to cross-check outputs. For traditional prompt-based, prompt-based, uh, workflows, we have another capability called LLMChallenge. So for you to get a better idea of what these
[00:16:30]
capabilities are, I’ll just take you through the platform, introduce you to the interface, and, uh, we’ll see how this comes into the picture
So let me go back to the platform. So we’re currently in LLMWhisperer. I’m just going to click on this toggle and go into Unstrap. So LLMWhisperer, uh, can be considered as a part or a segment of Unstract. This is the, uh, complete picture though. So we have the Unstract interface over here. It opens up to a dashboard on how I’ve been using, uh, the
[00:17:00]
platform and processing my documents.
Now, I have a couple of prerequisites that I have to, uh, do. So I’ll have to connect with a couple of connectors that I need. So, um, Unstrap is an LLM-driven platform. We have a bunch of popular LLMs with which you can integrate with over here. You can see I’ve connected with a few of them. There are also vector DBs that you’ll have to connect with, embedding models, and finally, text extractors.
So here’s where you will find LLMWhisperer.
[00:17:30]
This– these are the pre-processing, um, options that you have. So once you connect with all the relevant connectors that you need, you can get started with document extraction. So with this, we’ve actually completed the text extraction phase, and we’ll be going into the development phase.
So that brings me to prompt engineering, and we just spoke about agentic extraction, which means I can, um, basically have the system itself generate the prompts instead of doing it from sc- uh, from scratch. So in this
[00:18:00]
demo, I’m going to be creating a new project to process invoice, uh, invoices. So let me just call this the invoice extractor tool.
And I’ll have to give it a relevant description as well. So once I, uh, do this, this opens up the agentic prompt studio. Now, prompt studio is where you perform the prompt engineering in Unstract, and this is how the agentic prompt studio looks. You, uh, the first step over here is you’ll have to set up the
[00:18:30]
connectors or the LLMs that are going to be working on this project.
So you have the flexibility to define different LLMs for different operations that are going to be done. For instance, the extractor LLM over here is used only to run the extraction prompts on your documents. The agent LLM is used only to generate these prompts and, uh, the schema as well. So I can define a different LLM for it over here, and I’ll have to connect with an LLMWhisperer text extractor connector.
[00:19:00]
And finally, also define a lightweight LLM model, which basically performs lightweight tasks like generating the prompt metadata. So once I’m happy with these changes and, uh, with these selections, I’m gonna click on Save, and I can upload the documents that I want. So, uh, let me upload three invoices over here, and I’ve carefully chosen three different kinds of documents so that you, um, get to see a good variety in this demo So we have the documents uploaded over here.
So you can see I have a scanned
[00:19:30]
invoice, which is again, uh, not aligned properly. I have a handwritten invoice So handwriting is another major difficulty that traditional OCR or legacy IDP faces. And we also have a digitally native invoice over here. So the first step, as I mentioned earlier, is to extract the text.
So you get the document in, now you have to extract the raw text from this, uh, from these documents. So that’s exactly what I’ve enabled by clicking on the buttons under raw text. You’ll see that in a couple of seconds, you will
[00:20:00]
have the same, uh, layout preserved text extracted as we’d seen earlier with LLMWhisperer.
So what’s happening over here is, it is LLMWhisperer working in the background, and you have the extracted text over here. So this is the digitally native invoice. You have the, the handwritten invoice over here. So you can see how everything has been extracted with the name, the address. There’s a checkbox over here.
So all of that has been extracted perfectly well. And we again have a scanned invoice. So this is the first
[00:20:30]
stage, and the next one would be, uh, where you kickstart the agentic, um, schema generation pipeline. So the first step is to generate the schema as to, uh, where you define what is– what are the data items you’re going to extract from these documents?
What are the data types of these data fields and, uh, the structure, the overall structure of the output. So the first step in the agentic schema generation pipeline is to generate, auto-generate a summary of each of these individual invoices. So that’s what I’ve
[00:21:00]
triggered over here. So you’ll see in a couple of seconds that, uh, the system gives me a summary of all the data fields that are present in each of the invoices.
So if I click o– if I open the scanned invoice summary, we have– that it has a restaurant, I mean, it has a name, uh, a restaurant name, a business type. There’s the address line one, line two, and for each of these values you have detailed description that is again auto-generated, like, uh, what is exactly, uh, what, what is the description of this particular data field, the data type, as well as
[00:21:30]
example values.
So this is done for each of the individual test documents that you upload. So this is the first step, and what happens after this is I’m going to click on Generate schema, and using the LLM that I defined, it’s going to generate an overall schema which unifies all the summaries that we’ve seen. So what happens is it puts together all these summaries, and sometimes you might have to also normalize certain values.
So for instance, the date in a particular document could have the date coming first followed by the
[00:22:00]
month, whereas in another document you could have the month coming first followed by the date. Now when you extract these values and push them to the output, uh, destination output, uh, to the output destination, sorry, you wouldn’t– you will have to maintain– you might want to maintain the same format.
So these are all the steps that are done over here automatically by the system itself. Now we’ll wait for a couple of, uh, this usually takes a couple of minutes because it’s unifying the fields. But I’ve already run this, uh, project, uh, once already in Prompt Studio just to
[00:22:30]
give you an idea of how it looks since I wanted to save time in the webinar And I have the completely done project over here.
So, uh, over here I’ve gone through all the steps in the Agentic Prompt Studio, and this is basically how the schema looks after, uh, you know, once you see that, uh, once you see the schema generated over here, it’s going to look more or less like this. So you have the unified fields across, uh, that are put together from all the different test documents.
And, uh, for each of them, you have the description, example values, data type, and
[00:23:00]
the, uh, the data field’s name. So this accounts, I mean, this makes sure that you do not miss out on any fields, because when you’re dealing with multiple test samples, there might be certain, uh, documents that contain an extra field that, um, other documents might not have.
So when you’re generating the schema manually, this could– these could be the little details that you might, uh, miss, you know, on account of hu-human error, which is completely taken care of by the platform over here. So that is the first step that you’ll have to do. The second step would be
[00:23:30]
once the schema is generated, would be to create the prompt.
So that is what you’ll see. Uh, you know, let me enable it over here, so you can see in, uh, in the live demo that I showed you, the schema is again, we have a similar schema produced over here. Now, I can go through the schema and I can edit it as well. Now, for the want of time, I’m just gonna go ahead with this.
Next step is to kick start the prompt generation pipeline. So this is going to use the schema and, uh, the extracted text and create a detailed prompt which gives me the
[00:24:00]
exact instructions on how I’m going to extract the data from these documents. So this will again take a couple of minutes. Let me take you back to the sample project that I had.
So this is basically how the extraction prompt looks. You can see that it has multiple subsections, and all of this is actually generated manually. So you have the task overview, what the output schema should look like, and you have that, you know, the, uh, the system automatically specifies what is the data type and which are the required fields for extraction.
[00:24:30]
Going further down, you have certain, uh, pre-field extraction guidance, so business information fields. So if you look at this in more detail, like for instance, if I want to extract the business name, it is a required field. And the system also goes into the details of where to look for this particular, uh, data field in the document.
So what, uh, what are the, uh, sample or the example values that you might come across. So that is being done for each of the data fields that are extracted. So this is the level of detailing that
[00:25:00]
goes through or that the system actually goes through and you can start working on top of. So you have this for all the different data fields in the document.
And here are some formatting rules on how to format your, uh, values
And finally, there’s a sample output as well. And you also have a section covering edge cases and special instructions in case you run into certain, uh, ambiguous, um, fields or missing data. So how do you handle these cases? All of that is
[00:25:30]
specified over here. And again, as I mentioned earlier, you can edit this also.
So I just have to click on Edit and edit any of the fields that I want. So for instance, let me say that, um-
Just a minute
All right, so I can just remove certain fields over here and click on Save. And once I do this, I’ll have
[00:26:00]
to, uh, give it a new description. So in this case, I’m just gonna put it as V2, but if you are actually working with a real use case, then you might want to give it a description as to why you edited this or what this new version of the prompt represents.
So once you do this, you click on Save, and it gets saved as a new version. So, uh, the Agentic Prompt Studio also supports prompt versioning, where you can go through the history of your prompts. You can go to the older version, load this, or go through the, um, next versions as well. So
[00:26:30]
this is another capability, and you can compare the two versions as well.
So over here, I just have to click on V2, and the system also automatically highlights the exact area where I made a change. So you have version one on left, on the left and version two on the right. So this is another, uh, capability with the Agentic Prompt Studio. And finally, once you’re happy with the prompt, what happens is you run this prompt once on each of the documents.
So let’s go back to our live demo. So okay, it’s still getting generated, so I’ll
[00:27:00]
quickly take you through what it actually looks like. So once you run the extraction prompt that you see over here, once it’s generated and you make any edits on top of it that you want, you run it against the test samples, and what happens is the system generates a verified data set for each of the documents.
So you can go through the Verified Data tab over here, and I can change the invoices over here on the right-hand side. And I have different data, uh, fields that are extracted for– against each of the values. So what happens over here is the
[00:27:30]
system does an initial, uh, you know, um, extraction where it extracts each of the data fields.
And as a user, what you’ll have to do is go through each of these fields manually and check if the extraction has been done correctly. Now, I tell you the, uh, importance of this step because once you make these corrections, this becomes your golden standard that, uh, you’ll be, you know, um, evaluating against with further extractions that you perform in the project.
Because with real business use cases, you are, you are
[00:28:00]
going to come back at occasionally, and maybe you might want to change the prompt. So sometimes when you change a prompt, what happens is it affects certain extraction outputs that you did not intend to. So to keep a close track on how your extraction values are being affected, you can maintain a verified data set that becomes your golden standard.
So again, this is editable. I just have to click on Edit, and let’s say that I want to change a certain number, uh, a certain data field that is extracted. So over here, I have the due date as September twenty-fifth. Now, this might be correct from what is, uh, whatever is the
[00:28:30]
value given in the document, but just to, you know, help you understand this better, I am going to maybe make this August.
So once I do this, this becomes my verified data set. This becomes the correct value that I will be comparing subsequent extractions with. So once I click on save, yeah, this is saved right now. And what happens next is you run the extraction prompt. So, uh, let me just click on extraction over here for the documents, and you will see that, uh, what happens is
[00:29:00]
the system automatically compares the extraction output over here with the output that is present in the verified data set, and it would give you an overall accuracy score for each of the extracted documents
All right, so you have the, uh, accuracy scores and everything given over here. I can go into the extracted data, and I can view this as a JSON as well. So if I click on each of these, um,
[00:29:30]
accuracy scores, it basically opens to the comparison between the data extracted versus what was present in the verified dataset.
So you can see that each of the fields have automatically been highlighted. So, um, you have the, uh, extraction like this was the change that I made. So the initial verified dataset had September, and what I changed it to was August. So you can go through this for each of the extracted, uh, each of the extracted fields where it has
[00:30:00]
marked, um, a mismatch.
So this is an, uh, efficient way of controlling how accurate your, uh, extractions are. And again, the Agentic Prompt Studio comes with an analytics tab where you can track your projects and with key metrics like the total number of fields extracted, the overall accuracy, the top fields that are mismatched.
You also have a mismatch metrics over here, which gives you a bird’s eye view of what are the fields that were incorrectly extracted. So again, I can
[00:30:30]
click on any of these fields, and it automatically highlights the exact area that I need to go to So these are all the various capabilities that you have in the Agentic Prompt Studio.
And, uh, mainly if I have to sum it up, the key, um, aspects or the heavy lifting of prompt engineering earlier were to define the schema, to write prompts, and to also spec, uh, you know, ensure that the output is accurate. So these were the three key heavy lifting items that were being done earlier, and all
[00:31:00]
of that is made extremely simple and, uh, most of it is automated over here for you with the Agentic capabilities.
Now, the final step, once I’m happy with the extraction across all my, uh, sample documents, is to export this particular project as a tool, and I can then use this tool in any of the deployment options. So we’ll– let’s come back to this. We’ll circle back to this. But for now, I’m going to be going back to the, um, uh, presentation.
But before that, I also wanted to quickly take you through the traditional
[00:31:30]
Prompt Studio. So the Agentic Prompt Studio was more of a 2026 capability, where we introduced the auto generation of schema and prompts. But before that, where, uh, we also had the prompts, the traditional Prompt Studio, where you would have to define the prompts manually.
So this is still an option that you have today in case you ha– your requirements are very minimal. Let’s say you don’t want to extract so many, uh, different data fields or you, you know exactly what you want, you have a prompt ready. So in these specific cases, you might want to go for an, uh,
[00:32:00]
traditional Prompt Studio.
So over here, this is how the interface looks. You can define multiple prompts over here for you to extract, uh, data from. And, uh, you also get to specify the output data types. All of this has to be done manually over here. And as you can see, we have the raw view over here as well. So in this particular project, as you can, uh, I mean, as the title indicates, it’s a credit card parser tool that we are looking at.
So you can manage the documents over here. We have multiple, um, uh, credit card, uh, samples. So if I just change the
[00:32:30]
document, we have a different credit card statement over here. So, uh, I was also talking to you about an accuracy-enabling capability called LLMChallenge that is present in the traditional Prompt Studio.
So that is accessible under Settings. So over here you can see LLMChallenge Now, what this capability exactly does is you have an extractor LLM that you define, which basically does the extraction on your project. So in this case, uh, in this particular project, it’s Anthropic Opus. But when I also
[00:33:00]
define an LLM, a challenger LLM, what happens is these two models work on the same prompt and perform the extraction, and they compare the extraction outputs with each other.
So only if the comparison matches is it given to the user. So this is one way of enabling accuracy and eliminating LLM hallucinations. So you can also inspect the conversation between these two models by clicking on the LLMChallenge log that you have over here, and it opens up to the extraction output that you
[00:33:30]
have, the challenger output that you have over here, and you get a score.
So how well did it match? And you also have a feedback that the challenger LLM gives you. And this is the level of detailing that you can go to to ensure the accuracy of your extraction outputs. So that said, uh, let me go back to the presentation and we’ll go ahead, uh, we’ll move on to the next items on the checklist.
So up next we have tool, uh, prompt and tool maintainability. So setting up your extraction system
[00:34:00]
is one thing, maintaining it over time is another. So business rules change, new fields get added, data sources get updated all the time. So every time that happens, someone has to go in and update the extraction logic manually.
Modern platforms, however, solve this with dynamic prompts, where instead of hard-coding values into your prompt, you use variables that pull out live data, that, that pull it from live data sources. So what we mean by this is, let’s say you have a prompt that is checking… Let’s say
[00:34:30]
I’m extracting some data from an, a shipment document, and I want to check if a product is within the limits of the weight that is specified by my business.
So let’s say it has to be within ten to seventy kgs. So if I’m specifying this in the prompt, then, uh, I, I want to check if the product, um, you know, qualifies this condition or not. So in this case, when I write the prompt, traditionally, if I hard-code the values in it, let’s say that I’m actually writing that, uh, the weight return positive if
[00:35:00]
the weight falls under ten to seventy kgs, then let’s say I change the limits in my business later on.
That means someone will have to come back to the prompt and change the prompt as well, which is increased maintenance. However, what we are suggesting over here with dynamic prompts is instead of hard-coding these, uh, limits into the prompt, we can add variables. So these variables basically fetch the da- the values from a particular system in your business.
So once you update it in one place, it
[00:35:30]
automatically reflects in your extract– uh, in your document extraction system as well. So that is one dynamic, uh, capability that helps with better prompt and tool maintenance. And you also have other dynamic capabilities. For instance, in certain use cases, you might want to extract the output from your document, but send it through another external business system where you enrich the value or validate the value and send it back to the extraction system before, uh, pushing it for downstream operations.
So these kind of
[00:36:00]
requirements also, uh, should be supported ideally in a modern document extraction platform. And we’ll now just go back to the platform, and you’ll see how this is done using certain tools in Unstructured. So let me come back to Unstrap and I will be exploring another, uh, prompt studio project to showcase these tools.
So first thing, let’s explore the capability that is called the custom data parameter. So this was the capability I was talking about earlier, where you use variable references to specify
[00:36:30]
certain values instead of hard coding them into the, um, prompt. So this is the exact example I was talking about. We have an air shipment bill over here, and I am basically extracting the total shipment weight for a particular customer.
And instead of giving the account number manually, I have it given as a variable. So, uh, they are going from the route, uh, we have the origin and the destination given over here instead of again hard coding the values and the total weight should be between the thresholds, the minimum threshold and the maximum threshold in the unit
[00:37:00]
that is again given passed through the parameter.
So what happens is instead, uh, this makes the prompt way more easier to maintain. And, uh, in the prompt studio you specify these values under custom data, which is under settings. So this is basically the format in which it fetches the values. And this will basically be once you deploy this particular project, you will have to pass these parameters through the API, uh, from which you’ll be able to fetch the exact, uh, values and use this for extraction.
So this is
[00:37:30]
the custom data parameter. The other one I was talking about is when you get an extraction output and you use that, you pass that output, uh, through another system to enrich it or validate it through a external webhook. So let me take you through an example for that as well. So this, uh, project is for the extraction of a form document.
I mean, a tax document. So we have the tax document over here. And, uh, this is basically the raw text that is extracted. So this is another difficult document,
[00:38:00]
uh, that is, you know, uh, used for extraction. You can see it has closely packed checkboxes, multiple text fields, and, um, a lot of lines that are closely packed.
So you can again upload your own documents, but this is basically the raw view that you have over here. Now coming to our, um, the main topic of discussion, we were talking about the post-processing webhook. So you can see in this particular prompt that I am extracting all the key details from this document.
Now, I have the option of adding an
[00:38:30]
external webhook over here. So what happens is it, in this particular webhook, what I’ve done is that it extracts the information from this document and it compares it with the extracted output from another document and returns whether, uh, the status is positive or negative.
So let me just show you how this works
Yeah. So we have the extracted output over here. So firstly, it extracts all the data from this particular document, and
[00:39:00]
finally, we have the verification that is done. So basically, we are matching the two documents based on whether the, uh, Social Security number matches. Once that is true, it is basically matching for two different, uh, values from both these, uh, documents.
So if the values actually match from both these forms, the match is returned as true. Otherwise, it’ll be returned as false, and this is done for two different data feeds. So this is basically what the post-processing webhook does because the values from the W-2 form are not present in this
[00:39:30]
form at all.
Now, if I have to show you a comparison, for instance, over here in this prompt, it’s the exact same prompt, but we have not attached the post-processing webhook. So if you look at the output of this particular prompt, you would see that the comparison is actually not present. So once I scroll all the way to the bottom, you can see that there is no comparison output over here, and that is what the post-processing webhook does for you So with this, let me again go back to the presentation, and we’ve covered, uh, point number five.
[00:40:00]
Moving on, we have cost optimization. Now, the good news on cost is that LLM pricing has been falling fast. So from early 2023 to 2026, costs for comparable LLMs have dropped over eighty percent and the trend is continuing. So the cost of AI-powered extraction is becoming increasingly accessible.
But also see if your platform also gives you extra tools to optimize these costs further on your end. So for instance, Unstract supports two key
[00:40:30]
capabilities: the single-pass extraction and summarized extraction. So what happens with single-pass extraction is that, uh, you basically– So initially, like let’s say you’re, uh, defining five prompts to extract, uh, data from a single document.
So ideally what happens is Unstract runs the document for each of these individual prompts every time they are extract– every time they are processed. So what happens with single-pass extraction is once you enable it, the capability basically combines
[00:41:00]
all the prompts into one single prompt over which the context, the entire context of the document is processed only once by an LLM.
So with this processing, all the data is again returned to the, um, respective prompts where, you know, you’ve defined, you’ve asked for that particular extraction. So this again minimizes the token usage on, um, I mean, with your LLMs, and this is basically where you have the single-pass extraction in the prompt studio.
[00:41:30]
You would find it near the settings, um, near the settings icon. And again, the next cost optimization capability we were talking about was summarized extraction. So this is again found in settings. What happens over here is that the system basically condenses the document into a smaller version on which you’ll be running the prompts.
So this again, uh, in its own way minimizes the token usage because you’re not running it on the, uh, complete document, but a condensed version based on what
[00:42:00]
data you want to extract. Moving on from there, point number seven is you should be able to have flexible deployment options. So once you’ve built your extraction projects, you need to be able to deploy it in a way that fits your business workflow.
So different teams and have different use cases. Some might want to trigger extraction via an API call from, from their application. Others might want to set it up on an automated ETL pipeline that runs on a schedule. You might want to connect it to a workflow
[00:42:30]
automation tool. So there are multiple, uh, ways in which you might want to deploy it.
So Unstract supports these capabilities and these, um, requirements as different deployment options. You have API, uh, deployments when you want to get an input document from an application, process it, and send it to an output, uh, send the output to another application. ETL pipelines are when you get the input document from a file system, and once you extract the data using an Unstructured project, you send it to an output, um, uh, to a destination
[00:43:00]
database or data warehouse.
And task pipelines basically get the input document from a file system and send the output to another file system. Again, you have MCP tools and n8n workflows as well. So for both MCP and n8n, you have individual, uh, servers for LLMWhisperer and, uh, and Unstract. So, uh, when it comes to n8n, you have individual nodes for Unstract as well as LLMWhisperer.
So these are all important, uh– I mean, it is very important that you look for a platform that supports
[00:43:30]
flexibility in terms of project deployment and, uh, in, in the upcoming demo, I’ll be taking you through how to set up a sample deployment using the Unstructured workflow. We’ll be setting up an, uh, ETL pipeline or looking at an existing ETL pipeline and seeing how it works.
But before that, I also wanted to combine this with the next, uh, item on the checklist that is human-in-the-loop. So, um, human-in-the-loop is a very important point. In this day, automation is everywhere, but that does not mean removing
[00:44:00]
humans from the processes. It only means that you automate operations where a human was never necessary in the first place.
So that is what human-in-the-loop is all about. And while evaluating document extraction platforms, you have to look for a platform that supports this capability. So what ideally happens over here is once you get your document into the system, you extract the data before– right before you send it to the destination That is where usually teams add the human in the loop layer.
So
[00:44:30]
y- there is a human checking the extracted output and seeing if it is correct before sending it down for downstream operations. So this does need not be done for all the documents. You can actually specify which are the specific documents that you want to route for human in the loop. And again, when you’re evaluating a platform, don’t just look for a platform that supports it, but it needs to also support a robust set of capabilities for this function.
So, um, I mean, firstly, it needs to support source document highlighting, packet processing
[00:45:00]
when you get documents in batches and you might want to re– uh, you know, review them together. And again, multi-layer review. So there are two levels of human review that you can actually set up, so to flag any errors that you come across.
And, uh, these are all some capabilities that we’ll be looking at in the demo segment that I’ll be going into now. And again, human in the loop is optional in certain cases, but it’s also a compliance requirement, especially in highly regulated industries like finance, healthcare, or insurance. So with that, let me go back to
[00:45:30]
the, um, platform, and I’ll show you how, uh, the workflow can basically be, um, you know, deployed in any of the options.
So once I extract… We saw how, you know, you extract the Prompt Studio project as a tool. So we saw how that was done in the agentic prompt studio. So in the traditional Prompt Studio, you have export over here, and you can export it as a tool. And what happens is, once you export this, you’ll have to create a workflow.
So, um, just to show you how this works, let me create a new workflow, and I will
[00:46:00]
just name this as Webinar Test Workflow
All right, so what happens is this is the workflow interface. I will have to set up the, uh, source connector. So where am I going to get this particular, uh, document from? So I can choose API or file system. So let’s say I go for file system. I’ll have to configure the connector that I want to use. So over here, it depends on where my particular
[00:46:30]
document is coming from.
So once I co-configure the connector, uh, I will also have to enter the exact folders to process from that particular connector. Now, I will be going through an ATL– uh, I mean, a workflow that is already set up. I just wanted to show you how this looks. And again, similarly, you also set up the destination connector.
So if you want to send the, uh, data back to another file system, then you can choose a file system again or a database. And again, you configure the connector over here, specify which table and all the
[00:47:00]
details required. And you’ll have to choose the prompt that you– I mean, you’ll have to choose the tool that you want to, uh, use for the extraction.
So we have multiple tools over here. For instance, if I go for the credit card, uh, extraction tool, if I just select this, this was the first, um, project that we’d seen on Prompt Studio. I just have to select this. And what happens is, uh, what this means is that whichever documents I incur from this source are basically credit card statements.
So they’ll be going through this particular tool. The
[00:47:30]
data is extracted. The data then flows into this particular database, into the table that I’ve specified in my configuration. So this will again be deployed as an ETL pipeline, and that’s how I go about setting up the ATL pipeline. So similarly, if I change this to an API, I will have to, um, you know, change the output destination to another API if I want an API deployed and so on.
And over here you’ll see that you’ll have to deploy it as an API. So, uh, this is how you set up your workflows, and you can also schedule these, uh, workflows to
[00:48:00]
run, you know, at specific schedules. Now, let me go to an existing workflow to show you how this is– how this looks. So in this workflow, what I’ve basically done is, um, I’m getting the input.
I mean, this is an ETL pipeline that I’ve set up over here. The documents are incoming from my, uh, Google Drive, where I am basically processing air tables, and it goes into an output database. So you can see that I have the table name over here and all the details given. And
[00:48:30]
I’m using a specific prompt that I have called AWB, which is another PromptStudio project that I have in my, um, account.
Just let me just search for this project.
For that so. Okay
Yeah, so you have the project over here. This is basically the extraction, uh, project that I’m using
[00:49:00]
in that particular ETL pipeline. So you can see that we have a couple of sample documents over here. We have the prompts given, and I have specified the ETL… Uh, I mean, I’ve specified the same project in the ETL pipeline
All right. So once this is done, I, uh, I can… I mean, as I mentioned earlier, I can enable this and schedule this to run on specific– on periodically whenever I need it. But
[00:49:30]
over here, I’ll– let me also talk about human in the loop since we covered it. So under destination, uh, database configurations, we have the database settings over here.
And when I click on human in the loop, this is basically the, um, set of conditions that the system will detect and route certain documents if they pass this condition for human review. So over here I can define how– what is the percentage of the total influx that I want to direct for human review. I’ve just given hundred percent over here, but let’s say I just want 20
[00:50:00]
percent of my total documents to go into human review.
Now, what, uh, what constitutes this twenty percent? So I have over here a bunch of rules that I can add. So I can… Let me say that if the shipper details has a confidence score that is less than point six, then I want that particular, um, that particular document to go into human, uh, for human review. So I can add rules, and I can specify whether I want to go for the not and/or, or logic.
[00:50:30]
So I can mix and match over here. I can also filter by value. So let’s say that I want to go for the carrier information, and let’s say I have a specific value over here So if the, basically, if the, um, extraction output contains this particular value, it will be routed into human in the loop. So, um, these are all…
I mean, I’ve just, like, given sample conditions over here, but you can play around with this, and you can define really complex conditions to
[00:51:00]
route documents for human in the, uh, loop. Now, I’ve already deployed this ETL pipeline, and, uh, I mean, this works as an ETL pipeline, so, uh, this would have already gone into human, uh, in the loop.
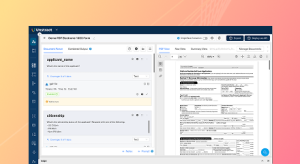
So let me go into the review interface. So this is the review interface. Once I click on Review, you have the review interface over here. So once the ETL pipeline runs, once it fetches the document from the source, runs the extraction, and sends it to the output, um, I mean, before it sends it to the output, it falls into the
[00:51:30]
review interface.
So over here, I am going to be searching for the exact project we looked at, and we have the, uh, project over here. I just have to click on Next, and it fetches the extracted output alongside the, uh, document that I got from the file system that I connected with. So again, the platform automatically highlights certain, uh, fields that were having, um, confidence scores less than a certain value or low confidence scores.
So I just have to click on these fields, and you
[00:52:00]
would see that the system automatically highlights this particular area in the source document. So this is what I was talking about earlier. This is source document highlighting. So I can click on any of these fields, and the system would automatically highlight the exact area from which this particular, um, data was fetched from.
And not only that, I can just double-click on these values and edit this in case the values are incorrect or I want a different value to go into my destination DB.
[00:52:30]
So once I do this, this is the new value that will go into the, uh, DB when I pass this forward. Now, this is just the review interface, and I have details of, okay, uh, how many reviews I have pending, how many documents are review in progress, how many are finished, how many have been sent to the approver, how many are in progress with the approver.
So you have all the details given over here, and I just have to click on Finish Review once I’ve reviewed the document. And what happens is this moves into the
[00:53:00]
approver’s workflow. So you can see that, uh, from review in progress, the status has gone to reviews finished. Now I just have to go into the approver workflow.
So it depends, like, it depends on who has access to the review workflow or the approver workflow and, um, whoever has– Let’s say there’s a person that only does the approving or someone only does the reviewing. So depending on what access you have, you can go into the, uh, review interface. Now, when I click on Next, I have the same document that comes into, uh, review over
[00:53:30]
here that I’ll have to basically perform a second layer of reviewing, and I’ll have to send it forward for downstream operations.
So you can see that the shippers, um, I mean, the city, uh, was initially New York, and I’ve changed it to Florida over here. So once I am happy with the extraction, I can click on Approve, and it would go into the destination DB. So you also have settings where, uh, in case, let’s say I do not– I want to auto-approve certain document classes, I do not want it to go through the
[00:54:00]
approval workflow at all, then I can manage the settings over here.
But again, there is packet processing. So what happens with packet processing is, uh, it’s again, another capability I was talking about. When you get documents in batches, you might want to process them together. So that’s what happens with packet processing. For instance, we have a packet over here. Let me fetch this packet
Okay. There are currently no documents available in this, but what happens is you will
[00:54:30]
be able to go through, um, the different documents present in a particular packet, and you’ll be able to review them in a single flow. So these are all the different capabilities that come with, um, human-in-the-loop, and I’ve just, like, kind of tapped the surface of it, but we do have extensive webinars on human-in-the-loop.
We have blogs on these capabilities that you can go through, or we also have a detailed documentation. Now, coming back to the presentation, that wraps up the eighth point.
[00:55:00]
Moving on, we have security and compliance. So when you’re processing invoices, contracts, medical records or financial documents, you are handling sensitive information.
The platform you choose needs to be built with security as a foundation. So look for compliances with major standards like ISO, GDPR, HIPAA if you’re in healthcare and SOC 2. And these are all again, compliances that Unstructured… Uh, I mean, these are all regulations that Unstract is compliant with.
And finally, as point number ten, the
[00:55:30]
platform itself needs to be deployable on your terms. So some organizations are fully on cloud. Others, especially in banking or healthcare, require on-prem deployment for data security reasons. Some might want to start small with an open source version. So Unstract supports all these three different versions and, uh, moving on to relevant LLMWhisperer, our text extraction tool is also available as an API, a Python client, a JavaScript client, and, uh, as I mentioned earlier, it’s also available as a free playground for you to test it before
[00:56:00]
you integrate.
And that brings us to the end, and, uh, we’ve kind of covered all the capabilities that we had on the checklist. So, um, before we move on into the Q&A, we’ve seen from our users that with Unstract, they’ve been able to achieve 99 percent accuracy, a 90 percent straight-through processing rate, 20 percent, uh, I mean, a 20 x improvement in operational efficiency and 80 percent fewer
[00:56:30]
human touch points.
So, uh, you can try this out. We have a free trial as well. So I’ll ask my team to drop the relevant links in chat for you to check out. And in case you want to sit with us, I’ve tried to, like, put together all the capabilities that I wanted to cover today and, like, show you as much as I can from the checklist.
But in case you wa- you have specific doubts or you have, uh, you want a conversation with the team, you can sign up for a free personalized demo. So we’ll drop the link in chat, and it’ll also be available on our feedback
[00:57:00]
form in case you want to explore this further. And now let’s go into the Q&A segment in case we have any questions to make.
[00:57:30]
Okay. I’ll just wait for another minute. Okay, I think we have a question
Yes, uh, Agentic Prompt Studio seems nice. I like the automation of multiple steps. Can the prompts be edited if there are issues or,
[00:58:00]
uh, it isn’t ex-extracting the right information? Definitely, you can edit it, and you can also save the edits as different versions. So you can edit the prompts and, um, you can c-move, go back, roll back to a previous version at any time as well.
Okay, folks, I think we are kind of running out of time here. Uh, please do ask your questions, or you can leave them in the feedback form, uh, where in the– under the review section, and we’ll be getting back to you as soon as possible via email. So, um, uh, I
[00:58:30]
just have to wrap this up because we are running out of time.
It’s been one hour already. So thank you so much for joining us today and, uh, I hope you had an insightful session, and I, I hope to see you in our upcoming webinars as well. Thank you.
See Unstract in action with walkthroughs of core features and real extraction workflows.
Managed cloud, on-premise, or open-source. Unstract adapts to your infrastructure needs, so choose what works best for you.

Prompt engineering Interface for Document Extraction

Make LLM-extracted data accurate and reliable

Use MCP to integrate Unstract with your existing stack

Control and trust, backed by human verification

Make LLM-extracted data accurate and reliable