[00:00:00]
Hi everybody. Hope you’re all doing well today. Thank you so much for joining this session on how AI and Human Intelligence together can give you 99% accurate document data extraction. I’m Mahashree, Product Marketing Specialist at Unstract and also your speaker for this webinar today. So we’re all aware of how rapidly AI is growing today, paving the way for seamless automation, even in complex business workflows.
But in many cases, especially in document
[00:00:30]
extraction use cases, human intervention in these workflows still remain an anchor to the overall success of the process. So in this session we’ll cover an overview of human in the Loop deployments, especially in document extraction pipelines, how untraced supports human review as a feature, and also what is the impact that we see out of it.
Now, before getting started, I wanted to quickly go over a few session essentials or layout, few ground rules for the session. So
[00:01:00]
all attendees will automatically be on mute throughout the course of this webinar. In case you have any questions, please do drop them in the q and a tab at any time during this.
Session and we’ll be able to get back to you with the answers via text. Now you can also interact with fellow attendees using the chat tab. This is also where you let you let us know in case you run into any technical difficulties during this webinar. And as a final point, when you exit the session, you’ll be redirected to a feedback form where I request you to leave a review on so that we can continue to improve our
[00:01:30]
webinars going forward.
So that said, here’s the agenda for today to give you a quick bird’s eye view of what you can expect. So we’ll start off with the human in the loop overview, where we’ll cover what human in the loop is, why we need it, and where it can be deployed in the entire document extraction pipeline. This will be followed by the core chunk of the session that is the live demo of HITL, or human in the loop in Unstract.
So we’ll see how we can set it up, how to define access
[00:02:00]
permissions, and also how to go about the entire review process. Finally, before we conclude, we’ll also go over a few HITL best practices, and in case we have any questions remaining, we’ll also be venturing into a q and A session where one of our experts will be on air to answer your questions.
So that said, let’s kickstart this session. So human in the loop or HITL at its core is the practice of bringing human judgment in AI driven document processing workflows.
[00:02:30]
Now that is there the simple definition of it. What actually makes this truly powerful is that it enables better data quality, stronger compliance with regulations, and also greater trust in your automation.
Now, AI today can automate a lot, and it is only improving at a rapid pace. But again, AI is not infallible, and that is why human review becomes essential. There are still edge cases, low confidence extractions, and high stakes scenarios in document extraction,
[00:03:00]
which are just way too important for it to go wrong, and that is where human review becomes essential.
So where do we exactly place this in the entire document extraction pipeline. So what you see over here is a typical document processing pipeline. Uh, again, there are various use cases, but I’ve just taken a gen generic pipeline over here, so you get that document influx from your source. You might wanna classify your document and based on the document type.
You would route it to the different document workflows that you
[00:03:30]
have, and after that, you would extract the relevant data from the documents, prepare it, and finally store it in the destination. So this entire process can be automated by ai. So where do we insert the manual review without disrupting this process?
Now, there isn’t any hard and fast rule about this. You can go about it depending on what are your business requirements, but what we commonly see is that one of the main areas where human review becomes important or relevant is right after document
[00:04:00]
extraction. You might want to add a human over. Uh. You might want to have a human to oversee how the extraction has been done to verify where the data has come from and whether it is correct.
And you might also want this person to change certain values in case they’re wrong before it goes into the destination. And or you can also have it right at the beginning where you’re looking to classify your document and you might want human oversight to see where your documents are landing up, which workflows they are directed to and all that.
So these are just. Ways
[00:04:30]
in which you can insert human review, uh, in different places. But again, there is, as I mentioned earlier, no hard and fast rule about this. And you will have to, uh, look at your own specific use case before arriving at this decision. So now that we’ve seen what is human in the loop and uh, where it can be inserted in the entire document processing.
Let’s just go over why HITL is really, uh, required today. So we already touched upon this, but to reiterate, we see two major implications where
[00:05:00]
HITL becomes important. That is accuracy and compliance. So elements today when the advanced models can sometimes misinterpret, uh, difficult documents. It could be ambiguous layouts, mis misclassified documents, or even poor scanned quality.
So when this happens. Human review becomes the safety net to catch these misses before they end up, uh, you know, having an impact on the downstream consequences. And secondly, having a human in the loop is often a compliance requirement in highly
[00:05:30]
regulated industries like finance, insurance, or healthcare.
So regulations such as GDPR, HIPAA. Financial reporting standards don’t just demand accurate data. They demand traceable and also auditable processes. So including human checkpoints in your automation pipeline would reduce this risk and also creates a defensible audit trail to prove that diligence was followed while extracting data from these documents.
And beyond just accuracy and compliance, there’s often a
[00:06:00]
third overlooked benefit that is trust. So when stakeholders know that there’s a layer of human oversight, they’re more likely to adopt and trust the automation system that you have in place. So to sum it up, HITL helps bring, helps bridge the gap between rapid automation and responsible ai.
So now that we’ve taken an overview of HITL, let’s see how this can actually be deployed in practice using Unstract. Now I’m aware that some of the,
[00:06:30]
um, people in the audience today are completely new to the platform. So I wanted to quickly take, uh, give you an overview of untraced and, uh, what we do.
So Untract is an LLM powered unstructured data ETL platform. If I had to briefly bucket the capabilities of the platform, I’d have two main categories. That is the development phase and the deployment phase. So in the development phase is where you would upload your documents for extraction. So this is done in a prompt engineering environment
[00:07:00]
called Prompt Studio, where you would upload your documents, define prompts to extract data from these documents.
And the first step that is done in Prompt Studio is to basically extract the raw text from your original document. And this is done using a text extraction tool. And uh, one of the text extraction tools that you can connect with on the platform is. LLMWhisperer, which is again Unstract’s in-house text extractor, known to produce really good, uh, uh, LLM ready documents, so it would extract the text and
[00:07:30]
also create it in a format that is best consumable by lms.
And moving on, you can then, um, define prompts over your documents, which would define what data you want to extract as well as the schema you want this to be extracted in. And once you’re happy with the data that is being extracted and the format in which it is being extracted in, you can then. Uh, export your prompts to your project as a tool and then deploy it in any of these four deployment options that we have.
So these deployment options are offered for you for
[00:08:00]
flexible deployment so that it can suit a wide variety of use cases when it comes to document extraction. So, for instance, you can deploy this. A project as an API deployment where you have your incoming document from an application, you might want to process it using a specific project and send the output data back to another application.
ETL pipeline is when you get your data, uh, or document from, uh, a file system like Google Drive. You might want to process it and send the output data to a database or a data warehouse. Task
[00:08:30]
pipeline is similar, but you get the document, uh, incoming from a file system, you might wanna process it and send it back to another file system.
And in any of these layers we can also. We can also include human in the loop as uh, an extra layer. So what happens when you include human in the loop, in the ETL pipeline is basically you get the document, you, uh, get the data extracted, and then there is a layer of human oversight to see whether the extracted data is accurate, and then we pass it on to the
[00:09:00]
database or whatever the, uh, relevant destination is.
So that is the core demo segment that we’ll be looking at in this webinar, how to set it up and how to, uh, operate this entire workflow. And to, again, throw out some numbers about Untraced. Just to give you a better idea, we have over 5.5 k uh, plus stars on GitHub, a nine 50 plus member Slack community.
And today we are processing over 8 million pages per month by paid users alone. So that said, let’s move on into the Unstract
[00:09:30]
demo. I’ll give you a quick overview of the platform and how it works so that you’d have better context when we move into the uh, HITL demo after that.
Alright, so what you see over here is the Unstract interface, and if I were logging in or signing up for the first time. What I’ll have to do is set up certain prerequisite connectors that you see over here on the settings. So as I mentioned, this, uh, is an LLM driven platform. So uh, you’d want to connect with
[00:10:00]
some of the popular LLMS out there, and you have the option to do that over here.
So you can see that I’ve connected with four models already, and you’ll also have to set up vector DB’s, embedding models. And finally, the text extractor that I was talking about. So here’s where you’d also find LLMWhisperer, along with other text extractors in the market. So once you set up these connectors, you can then move on to creating your prompt studio project.
So this is where you’d be uploading your documents and also defining the prompts that you
[00:10:30]
want to run against them. So in this, uh, webinar, I’ll be delving into an existing Prompt Studio project that we have, which is a loan application Parser. So in this project, what we have done is uploaded. Loan application.
And we also have a bunch of prompts over here on the left hand side to extract relevant data that I want from this particular document. So as you can see, this document is uh, a scan document. It has some handwritten text. And it’s a form. So I have some check boxes
[00:11:00]
and text fields as well. And on the second page, we also have a disoriented ID card scan.
So what happens with these documents when you, uh, normally upload it, uh, to an LLM without pre-processing is that it might not really be able to interpret the document or extract accurate data. And this is why we have the first stage over here to first pre-process this document into a format that is LM ready And this.
By, which was the text
[00:11:30]
extractor in this case. So this can, as you can see, the layout of the original document has been preserved in the raw view. Which is a pre-processed version. And this is really the secret sauce behind LLM ssa because this is what helps your LLM get the complete context of the original document.
So, uh, preserving the layout becomes very important. So you can see that details that were entered by hand, like the applicant’s name or this was a check box, uh, on the marital status. So all of these, all of
[00:12:00]
this data has been preserved. And on the second page we had. An ID cut scan that was disoriented.
So you can see how that has also been extracted while preserving the layout. So this text extraction is one of the powerful capabilities of LLMWhisperer, but there are. There. There are two other capabilities which play a key role when it comes to human in the loop, and that is that LLMWhisperer can actually give you a confidence score on each of the text extracted as well as bounding box
[00:12:30]
coordinates, which means it gives you the exact location where a particular text was present on the original document, and this capability enables you to perform source document highlighting.
So LLMWhisperer in this case, you can just see the text extraction output, let, but this is also a standalone application and can be deployed as an API. So let me just show you how, uh, it is able to extract the confidence score and, uh, as well as the bounding box, uh, when I basically run the same document that you see over here through the
[00:13:00]
LLMWhisperer API.
So I’ll just open Postman for you. And as you can see, I have uploaded the same document.
Alright. Yeah, so this is the same document that I’ve uploaded over here. And, uh, you get basically the confidence score for all the text that was present in the document. So you have the name over here along with the bounding box coordinates. So this gives you an idea of how confident you can be about a particular text
[00:13:30]
extracted.
This can also play a role when you’re looking to define what are the documents you want to be sent for the human review. Because if the confidence goal, let’s say, is below a certain threshold, let’s say it’s below 0.8, then you might want to send this particular, uh, output, uh, data for the human review.
So this is how this plays a role in HITL, and we’ll also, uh, show you how source document highlighting is done. In the upcoming segments of this demo. So you can see we have the confidence score and the bounding box for all the text over here,
[00:14:00]
along with the line metadata on, uh, where exactly each of the lines on the document are present.
Yeah. So you can see that this loan application is basically the same document that I’ve uploaded. Let me move back to the. So to quickly sum up Prompt Studio, you can see that we have a bunch of prompts over here, and each of these prompts are extracting some data that I want, and I’ve also given instructions on how I want this, uh, data to be formatted.
You also have
[00:14:30]
access to a number of output data types that you can choose from. And, uh, before we close this, before we wrap this up, there’s also advanced prompt studio settings where you have a number of features that will enable better accuracy, which are designed for saving costs. But one important feature that we want to cover in this webinar is the highlighting feature that you have over here.
So this is available only, only when you use LLMS as a text extract. Uh, text extraction service. So once I highlight, once I enable highlighting in this project, I’ll just show
[00:15:00]
you how this works. This is one of the downstream operations of the bounding box coordinates that you’d seen earlier. So what happens is, based on the bounding box coordinates, if I just click on any of this output data, let’s say I’m clicking on the citizenship type, you can see that the system automatically highlights that portion.
Where this particular data was fetched from on the original document, and this capability becomes very important when we have a human in the loop trying to review where the data was fetched from and how accurate it is
[00:15:30]
so I can perform this for any of the output that I have over here. For instance, if I click on hair color.
You can see that the system automatically takes me to the second page where the hair color was fetched from on the ID card scan. So this is what we are looking, uh, to also use in human review. So now that you have an understanding of. Um, studio and how this works. The final step you’d have to do is to basically export this particular document as a tool, and then you would be using this tool to deploy it
[00:16:00]
either as an API deployment ETL pipeline and so on.
In this demo, we’ll see how we can deploy it as an ETL pipeline and also include human in the loop in the entire workflow. So since I’ve already exported this particular, uh, project, I’ll be moving into the workflows. Let me just open a sample workflow for you to give you an idea of how this works. So over here, this is a completely different workflow that we had for a credit card, uh, statement, uh, document, and you can see that in the input
[00:16:30]
configuration.
This is an API deployment. So we have API given in the input configuration as well as the output configuration, and we’ve also dragged and dropped. Uh, a credit card parser tool from one of our projects. So you can see all the tools available over here. So you had just seen the loan application parser, so if I just search for loan application, you, you have the relevant tool over here and it’s just as simple as dragging it and dropping it into the, um, workflow chain.
But in this case, I will just leave it as such. I just wanted to introduce the workflow
[00:17:00]
environment to you and you can create a chain of one or more tools for processing as well. So once this is done, you this. Particular workflow will then be deployed as an API and you get access to the API endpoint, along with a downloadable postman collection as well.
So in this webinar, the main workflow that we want to look at is the loan application parsa. So let me just open that.
[00:17:30]
So this workflow over here is an ETL pipeline that we’ve set up. The input configuration is a file system, in this case, Google Drive. And all I have to do is basically authenticate my account and, um, I can also specify which folder, uh, that this particular workflow needs to connect to and the path over here.
To get the files present in that particular folder. So once I set up the input configuration, I can drag and drop the tool, which was the loan application parsa. And we also have the
[00:18:00]
output configuration over here, which is a database that I’ve connected with. So you can also give details of the table name and various other information that you want.
So this is again, where you have human in the loop as an option for you to set, uh, for you to set up. So let me just show you how that is done.
Alright, so over here, I’ll just remove this for now. We have the human in the loop settings and we have, uh, here,
[00:18:30]
here’s where you would set up, what are the rules that you want to follow in this entire workflow. So again, when it comes to enterprise use cases, they might be bombarded with a number of documents on a daily basis, and it becomes impractical to, uh.
Perform human review on each of those documents. So when that is the case, you might wanna filter out your documents and send only a few number of documents for the review, which might be important, or which might contain edge cases that the workflow, the overall, uh, pipeline might other otherwise miss.
[00:19:00]
So in these cases over here, you can define the percentage of your incoming documents that you want to set, uh, or send to human review. So I can give this as 30 or 40 depending on what number I want. And again, over here we have conditional logic. So what are the conditions that the document has to satisfy for it to go into human review?
So this again, depends on your specific, uh, use case and what you want, um, to be the factor that routes it for the review. So I’ll just show you how this is
[00:19:30]
done. So I can simply add a rev, uh, add a rule, and over here I have a number of, um, fact, a number of, um, values that I can filter it from. So in this case, if I can fil, I can filter it by confidence.
Let’s say that if the applicant’s address. Has a confidence score that is less than 0.7. I want this particular, uh, document to flow into the human in the loop review. So over here, I can just set this up as 0.7, or I can also filter it by value. So I, in case, let’s say you
[00:20:00]
have filtered by value over here.
So let’s say the employment status is given as a business owner. So I might want to process the loan applications based on business owners differently. So in that case, I might wanna have human oversight for whatever reason. So in this. Value, I’m just gonna give it as business owner. And if this is the case, this particular document should be routed into a human review.
So we again, have not, and, and, uh, or logic for you to, uh, set up these rules. So in this
[00:20:30]
case, since we’ve selected or if any of these conditions happen or prove to be true, this particular document that runs through this workflow will be sent for a human review. So let me show you where I have this document on my, uh, Google Drive.
So you’d seen earlier that we had it in the loan application folder, and we just have one document today over here, which is the same document you’d seen earlier. And this is just for demo purposes. So in this case, I’m going to just set that a hundred percent of my files need to be sent for manual review.
[00:21:00]
So depending on your use case, uh, look at the prioritize, what are the important, uh, data that you have and what really cannot go wrong, and, uh, you can then set it up accordingly. So once you set up the rules you have for the settings. So this is where the output data will be routed to after the human has performed the review.
So once the review is complete, you can either send it to the destination bb, which was the database that you’d seen configured earlier, or it can go back into the queue. So why do we
[00:21:30]
have these options? When it goes to the db, it is a, a simple flow that you routed directly to, but however, if you decide to send it back to the queue, you can then download it from the platform.
You can download the output, um, data from the platform, either as a JSON or a CSV, and then plug it into different downstream operations that you may want to then further send the data to. So that is the reason we have sent, uh, we have set two different options over here. So in this case, I’m gonna leave it as the destination DB that I want the.
Uh,
[00:22:00]
data to be routed to, and I can finally click on save. And with that, I’ve set up the human in the loop workflow, so let’s now trigger this entire workflow and see how this works. All right,
so once this is set up, I am now going to, uh, run this workflow.
And again, I can either run it over here. Um, which is for me to test how
[00:22:30]
this works on an impromptu basis. Otherwise, I can also, uh, you also have ETL pipelines that you can set up and run on a periodical basis. So in this case, you can see we have a number of ETL pipelines over here, including the loan application parsa.
So we have the source, the destination, and I can also set up Aron schedule for it to, um, run. So, uh, over here I have Aron schedule for it to be triggered on a periodical basis, and I can edit it according to my needs. So, uh, yeah, let me just go
[00:23:00]
back to the workflow.
So in this case you can see that, uh, I’ve gotten my result over here. And, uh, let’s see how the review interface looks now. But before we move to that, I just wanted to also go over another important layer when it comes to human in the loop. That is actually how do we set access permissions? Because businesses
[00:23:30]
are dealing with sensitive documents and sensitive information, so you have to be careful about who gets to access this data and also alter it before you send it for downstream operations.
So in order to show how you can control access permissions, let me go back to my presentation and I’ll quickly take you through where the settings are and how this can be done. So over here on my, in my OnTrac account, under platform settings that you’ll find under, uh, below all the connectors, you’ll have user management as a feature.
[00:24:00]
And once you move into this, you can then add multiple users to this account and also specify the access permissions or the roles that they have. So we have four uh, access permissions that you can choose from. The Unstract admin will have complete access over human review. The unstuck user would not be able to perform human review.
The unstuck reviewer can only review the documents but not approve it in case you want two different levels of screening for the review itself, which we have see in a little while. And the
[00:24:30]
Unstract Supervisor can review the documents as well as perform a second layer of screening and approve the documents before it goes into the db.
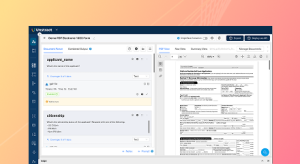
So this is how you can specify the access permissions and uh, we have it right here. So going back to the interface, you can see that I have now deployed this, uh, workflow. I’ve run this. So let me quickly show you how the, uh, review interface looks. That is the important or the interesting chunk. So over here, when I select
[00:25:00]
my profile, you can see that I have.
Two features review as well as approve. Now since I have the access for an untraced admin, I’m able to see both these features. So depending on the access permissions you have, uh, either one of these features would be present or none would be there. So let me just click on review right now and, uh, once I get into this interface, I can now choose from various document classes that I want to review.
In this case, I’m going select the loan application Parsa, and I’m gonna fetch the document
[00:25:30]
and you can see that the document is present over here. On the left hand side, along with all the output data that was extracted from the prom studio, uh, project that you saw. So we set it up in the prom studio project, and then it was, uh, deployed as a tool.
And we have all the output data over here. And an interesting thing to note or bring your attention to is that the system has also automatically highlighted. Data that has a low confidence goal, and in this case, a threshold is set to 0.9. So
[00:26:00]
any data that has a confidence goal less than 0.9, we have that particular output highlighted over here.
And this again, helps human review become more seamless because you can direct your attention, uh, accordingly and see what is the data that needs to be verified. So once I see this, for instance, if I click on the applicant name. You can see that the interface performs source document highlighting, and the system basically gives you an idea of where this data was fetched from.
And again, I can click on any other,
[00:26:30]
uh, data that I have over here and get that portion highlight, uh, highlighted so I can verify whether or not this is correct. And it doesn’t just stop at this. If, for instance, I wanted to change the applicant name, let’s say this was the applicant name given in the form, but there’s a request to change it.
Now. I can simply double click on this and edit the uh, name right here. So if I want to change the last name to Smith, I can do this. This name would be changed. And this is a name that would be in the database when you finally send it.
[00:27:00]
So once this is done, I can complete the review, but in case you do not want to send this particular, uh, document to be approved or to be sent to a second level of human, uh, screening, then you can just auto approve this particular document.
And we do have a feature, uh, for that as well, where you can select the class, the document class that you want. In this case the loan, uh, application.
Alright, uh, I’ll just select the credit card passer for now
[00:27:30]
and I can simply send it to the, uh, to be auto approved. And similarly, we can also choose users, uh, to whom review, I mean, who would auto approve the documents that come to them for review. So this is again, another capability that we have in case you do not want to, uh, perform a second level of review.
Now in this case, let me just complete the, um, review and I would send this. Document for the approval stage. So you can see in the queue details right now that
[00:28:00]
I have one document in the, which is Review in Progress, which is the document you’re seeing right now. And I also have one other document which is pending.
So let me complete this review. And now if I check the queue details, this has transitioned from the progress state and it has gone into the queue where, uh, review finished. So now I can, as an approver go into the approvers interface. Fetch the same document and the approval would again, go over all this data, make necessary changes if required,
[00:28:30]
and then when they approve this.
Particular, uh, document and the data extracted. Depending on the workflow, it would either go into the relevant DB or go back into the queue. Now, since we have set it up to go into a destination database, this should go into a database. I’ll just show you how this, uh, database looks over here. So you have a table and you can see that you have three, uh, rows over here.
So we are, we should be expecting a fourth row to, um, appear once we complete this approval process.
[00:29:00]
So let me approve this. And you can see that I get, I get notified that this was successfully sent to the destination db. Now going back to my DB and refreshing it,
you can see that the fourth row has been appended with the altered data. So if I just open this output, you can see over here that the applicant’s name has been changed. The last name as Smith, which
[00:29:30]
was the change that I performed in the Human uh, review interface so that folks sums up how you can perform this entire process and what are all the capabilities Unstract supports you with as well.
Now let me move back to the, uh, presentation and we also quickly go over how this can be deployed using an API trigger. Which is another option that we have really. So, um, yeah, so what you’ll have to do is, again, under platform settings, if you want to trigger this
[00:30:00]
review interface with, uh, via API, you’ll have to get into human in the loop settings that you’ll find under platform settings.
And over here you have access to various API keys that you can use for this deployment, or you can also create your own key as well. So we, I’ve already run this, uh, deployment and I just, uh, to save time and I just wanted to show you how this is done. So in this case, I’ve uploaded a, a credit card statement and, uh, to show you what the statement is, this is the document that I’ve
[00:30:30]
uploaded and you’ll see that through, via post pan, I can actually trigger the human review.
So just a minute, let me go back to Postman. I will, um, again run this request.
So while this runs, let me go back to the interface and I’ll show you how this actually,
[00:31:00]
uh, works. So what happens is. When you run that particular call via API, the particular document class would be sent for, uh, human review. So you can see that these are all the different document classes that were sent via API.
We are interested in the credit card, um, statement that we just saw. So if I click select this and fetch the document, you have the document right here. So you, you saw this was the document that we had uploaded on Postman and, uh, using the API key. Triggered the call and you have all the output
[00:31:30]
data present over here, which again, I can select or edit as I want.
So once I finish review, this would go into the approvals queue and I’ll have to next approve this particular document.
So once I do this, since this was triggered via API, this wouldn’t, this doesn’t have a destination bb, so it would automatically come back to the queue and how I can download the out, uh, the n uh, the JSON file with the
[00:32:00]
output data. Then, which was also edited by the human in the loop, is to select download and sync manager.
Over here if I get the finalized list, you, you can see that, uh, basically the output data from this particular review is present over here, and I can download this then as a JSON or a CSV, which I can use in downstream. Um. Operations. So this is how you can deploy human in the loop within Ract, and you can see that we had multiple
[00:32:30]
features to support different use cases.
So depending on your particular use case and what you want out of your review, you’ll have to carefully look at this and see how you want to set it up. So that said, let me go back to my presentation and we’ve actually come to, uh, the conclusion of this session.
So this is just to give you a summary of what we looked at today. We looked at two different ways of deploying HITL. One was through the ETL pipeline
[00:33:00]
where we saw the output of the destination dp. And the other one briefly that we looked at was the API deployment where we triggered HITL through API and uh, we also were able to route it back to the queue and download.
Access the output data as a JSON or a CS V file. So that said, here are few best practices that I wanted to quickly outline. Um. Uh, you know, in order to get started with this, so firstly we have set clear case specific
[00:33:30]
review triggers because as I mentioned, again, businesses might have, uh, a large number of documents coming in.
So you don’t have to review every document prioritized based on the each case or the compliance critical scenarios that require a review. And secondly, we have. Use conference scores to drive review. So conference scoring sets the threshold for human review in many ways, and this is a great way to, you know, uh, route your documents for manual review.
Thirdly, maintain
[00:34:00]
role-based access controls, so again, assigned permissions, so only authorized reviewers and approvers can access specific documents. And this is especially useful when we are dealing with sensitive data. Fourthly, implement a two-step review process. This is not necessary, and, uh, it, you can bypass this depending on the use case, but it’s always a good practice to have a double check system in place to improve the accuracy of your results.
Fifthly, we have automate review triggers, so as, as we saw earlier, you can
[00:34:30]
use cron schedule. Or API triggers and untraced automatically feed qualifying documents into HITL, minimizing the manual intervention you have. So, uh, all the running part of it, the operations that you require to get this workflow running can be taken on by the system itself and the human in the loop should only be able to ideally just perform the review and get going.
And finally, we have continuously refining review logic. So this is again, an important, uh, practice to
[00:35:00]
ensure that your HITL process is still relevant in the long run to always, uh, see how, where you’re getting the errors and to change your logic accordingly so that you are performing this in the optimal way.
So that said, we’ve come to a conclusion and, um, in case you are interested in exploring HIP. In a better way for and to see how you can adopt this in your particular business use case. You can sit on a free call with one of our experts and we’ll be able to
[00:35:30]
understand your business use case and help you also set it up if required.
Or even if you just want to learn more about this feature or, uh, untraced in general, you can book a free demo. So I’ll be running a poll now just to get your, uh, answers in just a minute. So if you are interested in this demo folks, please, uh, select. Yes.
[00:36:00]
Alright. I think I’ve launched the poll now, so I’ll give you some time for you to, uh, vote in case you want a, a personalized demo.
[00:36:30]
Yeah, we can meanwhile take up any questions if we have any. I think we’ve come to the end of the session.
And also in the webinar chat folks, we have a couple of helpful links you can take a look at. Um, our previous webinars, HITL documentation and even the blog for you to understand this capability better. Alright, so I think we can, uh,
[00:37:00]
move on into the q and a in case we have any questions remaining.
Otherwise we can, uh, head to the end of the session.
I think we have one question over here. Nare, would you like to take it up?
Uh, yeah. Uh, is there a range of time expected to refine prompts? I’m, I’m not sure able to un follow this. I was just trying to, uh,
[00:37:30]
Julie, like, uh. Specifically, are you, if you’re talking about like, uh, the prompt engineering itself, refining the prompts to make the outputs better? Yeah. You, you, you need to like in prompt studio adjust the prompts, uh, to make sure that it works across a sample set of documents, and then you can deploy it as an, uh, as an API or retail pipeline and use that along with the human in the group.
[00:38:00]
Thank you Naren. Um, okay. We don’t seem to have any other questions, so thank you everybody for joining this webinar today. We will be sending you the recording in a little while and you can always explore more, um, about untraced on our website and take a look at the HITL documentation as well. Thank you so much.
Have a great day.
See Unstract in action with walkthroughs of core features and real extraction workflows.
Managed cloud, on-premise, or open-source. Unstract adapts to your infrastructure needs, so choose what works best for you.

Prompt engineering Interface for Document Extraction

Make LLM-extracted data accurate and reliable

Use MCP to integrate Unstract with your existing stack

Control and trust, backed by human verification

Make LLM-extracted data accurate and reliable


How to pick the right document extraction platform in 2026: Legacy IDP to LLMs